An Original 1840’s Front Opening Fan Front Dress

This summer, I was very happily minding the shop one day, when my mom told me she had been at a garage sale that morning, and they had some antique underwear and hats there.  As I collect antique underwear, I didn’t want to miss out, so as soon as I closed the shop, I picked her up, and off we went!

We started out the sale by inspecting and acquiring a very large box of vintage hats, mostly from the 50’s and 60’s.  In the garage, I found an excellent bearskin muff and a white silk turn of the century graduation style dress.  There were a few antique nightgowns on the rack, but nothing that special.  About then, the lady asked if I liked old clothes, and told me she had more inside.  Oooooooooh.

The moment I stepped into the room, I saw it.  Hanging on the wall in unassuming plainness, but undeniable.  I didn’t want to act too excited there, so I added it to my pile, and got a box of antique underwear, and a black lace dress from about 1907, and a few other random things from the room.  I left shirtwaists and camisoles, and it was sad, but I had limited funds.

But this.  This was worth it.  I now have a front opening fan-front 1840’s dress.


1840's Front Opening Fan-Front Dress

1840’s Front Opening Fan-Front Dress

There are not many of these around.  I couldn’t find any on pinterest, and found only a few on a google search.  I found this purple silk one in a google search, and that’s about it.  I suspect that is because a fan front style is easier to sew with a single piece than with an opening right down the middle of it.

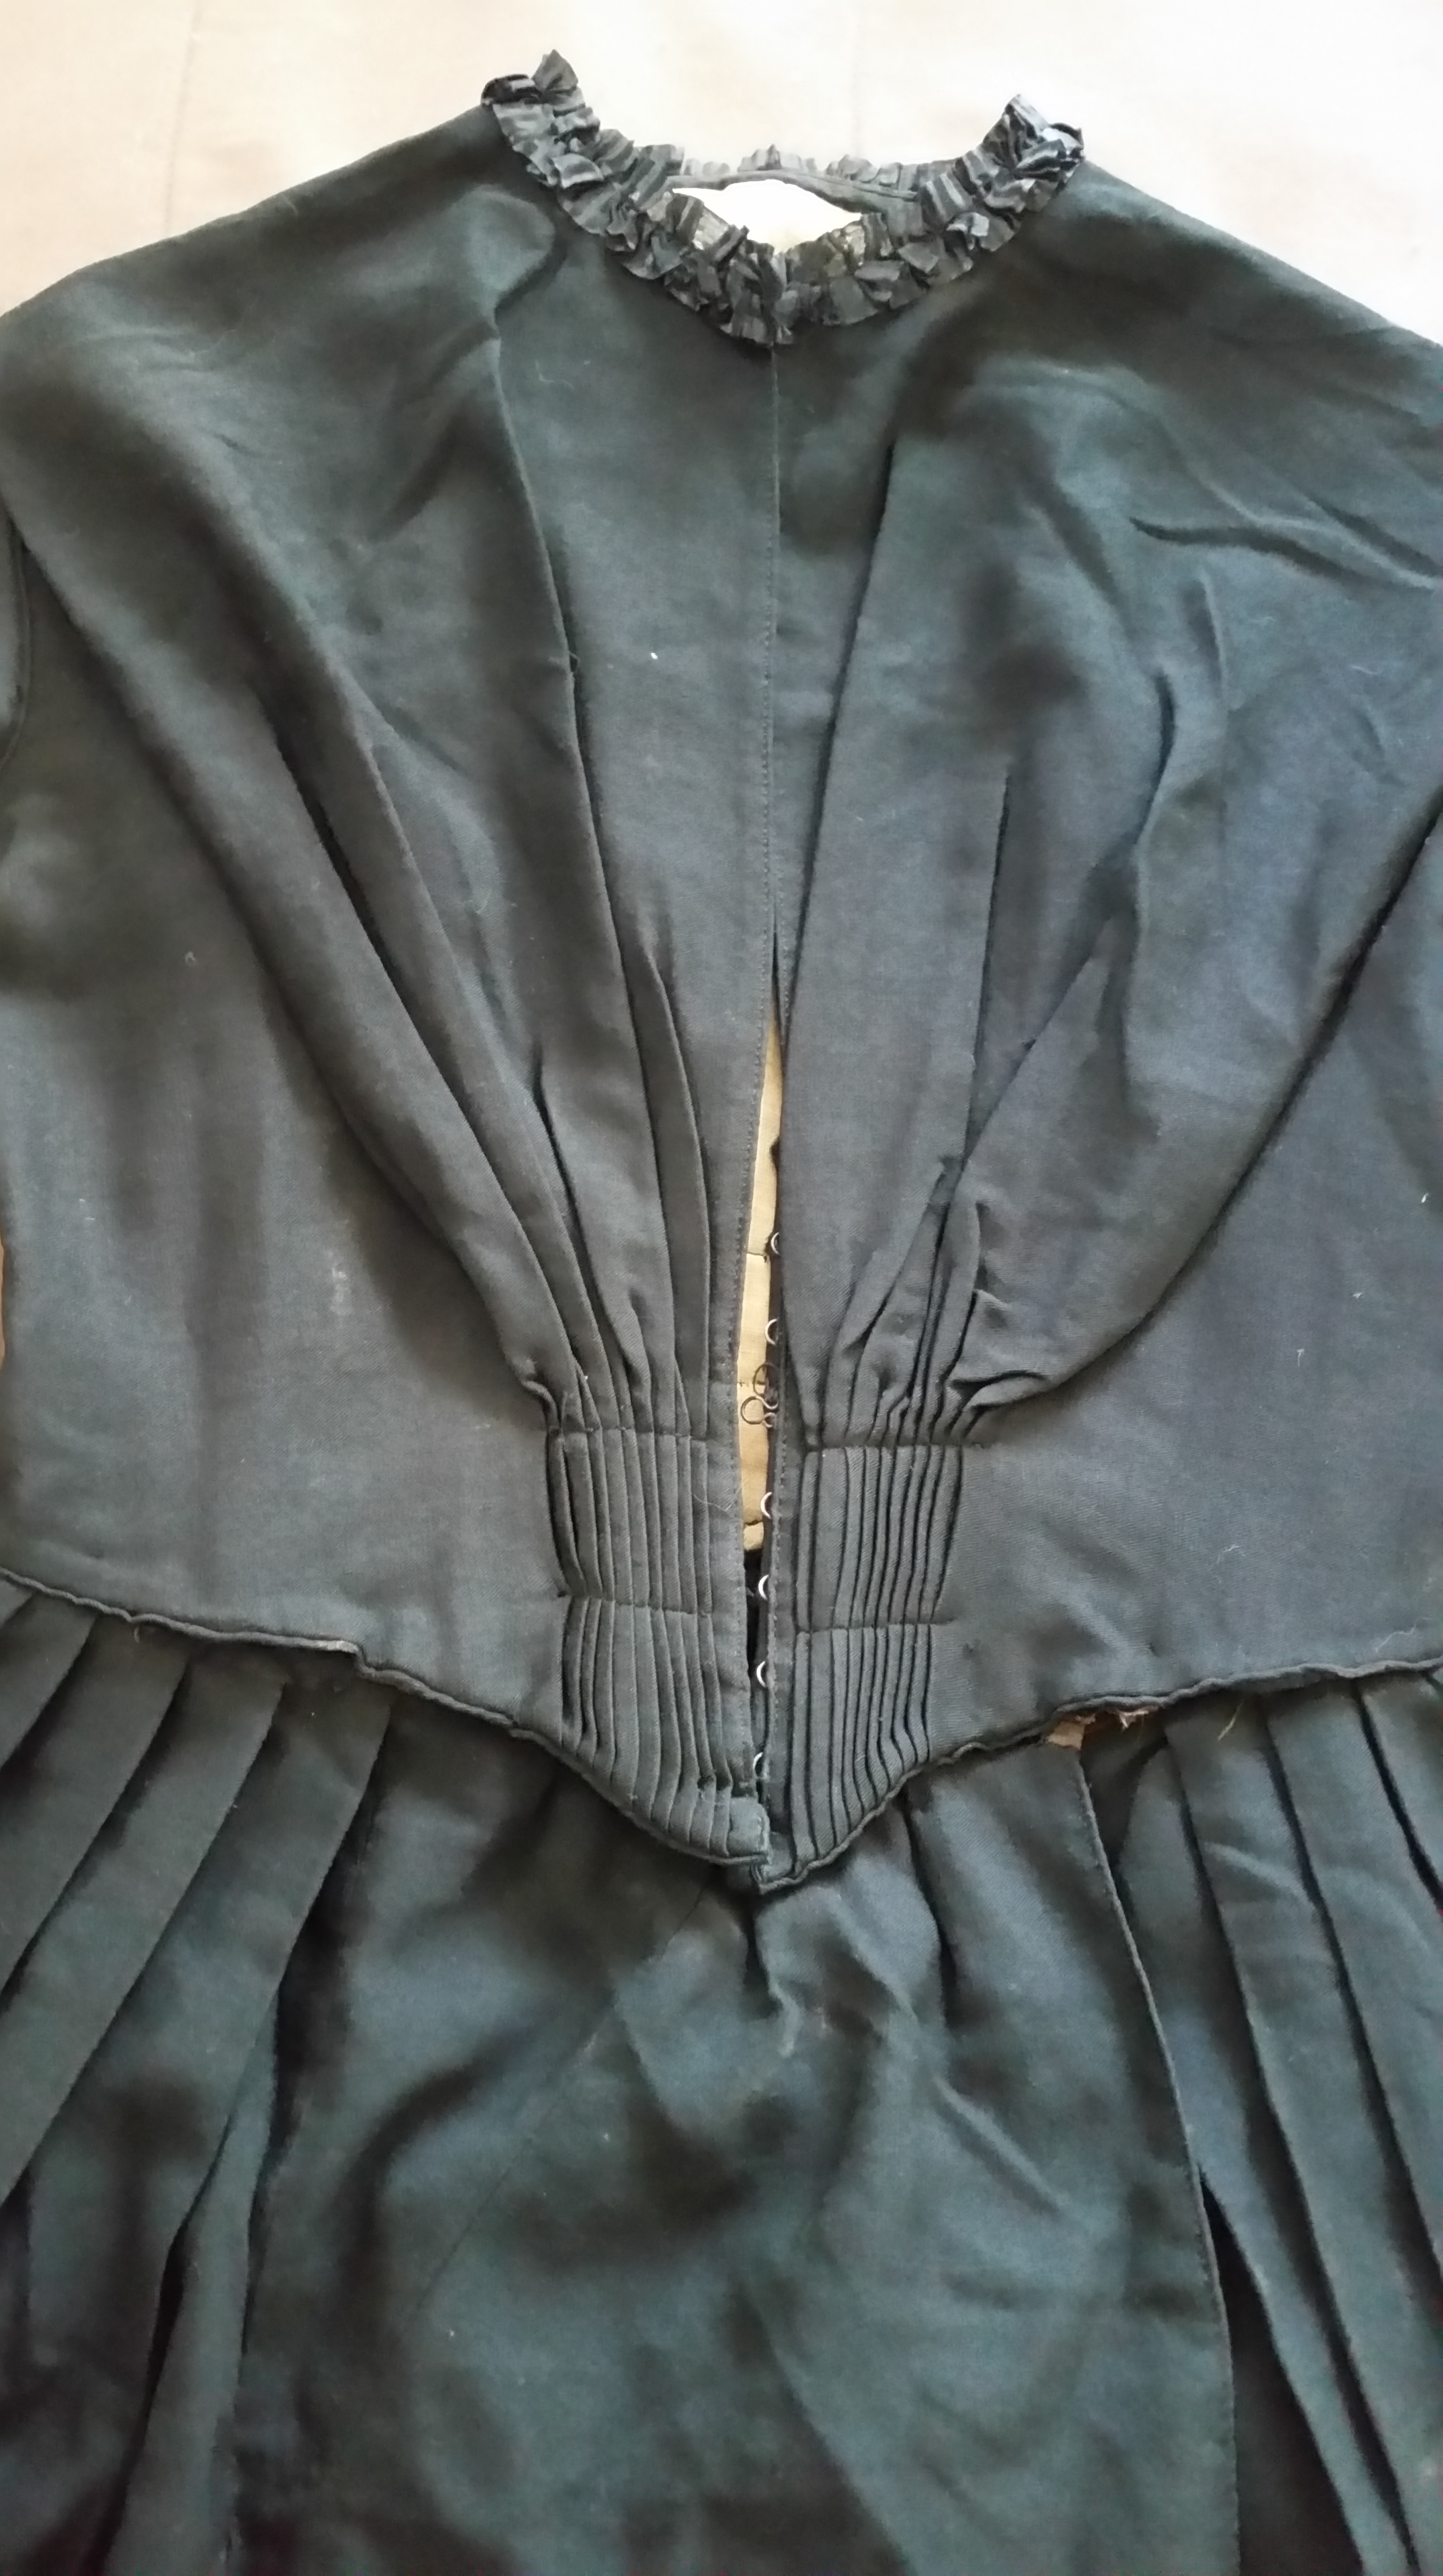
The dress is sewn of lightweight black wool, with a fan front and front opening, and a smaller fan in back.  It is somewhat smaller than my dress form, as you can see.

1840's Wool Dress Back

1840’s Wool Dress Back

Back of 1840's Dress Flat

Back of 1840’s Dress Flat

Front of 1840's Dress Flat

Front of 1840’s Dress Flat

The front opening closes with hooks and eyes.  It’s really neat and tidy, and if everything is hooked up, you can barely see the closure.  The edges just butt right up to each other.

1840's Dress Closure

1840’s Dress Closure

The hooks on the bodice are sewn in between the layers, except for one that apparently ripped out at some point and was sewn back on.  Ooops!
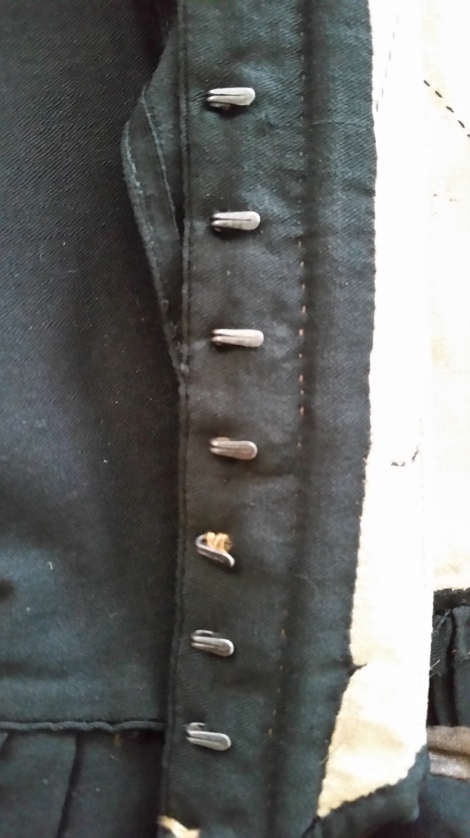
2016-07-10-16-03-53

Bodice Hooks

Pocket!

Pocket!

There is a pocket sewn into the right skirt front, right at the edge of the narrow front panel.  It’s faced with dress fabric, but the pocket itself is made of cotton.  (Top of the pocket is at the right in the above picture.)  The picture below shows the inside of the skirt, with the pocket.  As you can see, the front panel of the skirt was pieced, right at the top!  Meanwhile, the top edge of the skirt is overcast and folded over before being pleated and set to a cotton waistband/ binding.

Pocket on Inside, Plus Piecing

Pocket on Inside, Plus Piecing

The skirt is sewn straight across the waistline of this dress, and the waist seam ends a little past the front of the side seam.  It appears that the waist would have hooked straight across on a waistband, then the bodice closed over.  You can see the piecing in the front panel here.

Front Skirt Panel of 1840's Dress

Front Skirt Panel of 1840’s Dress

Back of Waistband

Back of Waistband

The skirt pleats are very even, and yes, those are boning channels above!

1840's Skirt Facing

1840’s Skirt Facing

The skirt has a very deep facing of polished cotton, and there is horsehair braid sandwiched between the facing and the skirt fabric, extending about 1/8″, to prevent wear to the hem.  There is a tuck about 1″ deep above the facing, which accounts for the stitching line you see in the above photo.  Most of the skirt seams are very narrow, with selvedge sewn to selvedge, except for this one, which is the narrow front panel seam.  Its one cut edge is whip stitched to prevent fraying.

Inside Back of 1840's Dress Bodice

Inside Back of 1840’s Dress Bodice

The lining is made of a heavy rough linen.  Heavy fabrics were often used as linings to support the bodice and prevent warping or stretching.  The back lining has pieces carefully patched in right at the shoulder.  Apparently, her piece of fabric wasn’t quite large enough in the right ways.  The shoulder seam is very neatly whip stitched to finish the edge.

Pieced Back Lining

Pieced Back Lining

Front Boning Channel with Baleen

Front Boning Channel with Baleen

Yep!  One of the original baleen stays!  You’ll notice there are diagonal lines sewn with a running stitch through the lining in both the front and back.  This prevents the fan front (and back) from collapsing outward and looking slouchy or untidy.  Even after all these years, the dress is well-shaped, thanks to the careful thought that went into constructing it.

Basically Shoulder Pleats

Basically Shoulder Pleats

The diagonal stitching lines are down under the diagonal lines in the bodice, essentially creating diagonal pleats in the bodice.  The running stitches hold it in place, and are hidden completely on the outside of the dress.

Diagonal Stitching Line

Diagonal Stitching Line

Our original seamstress didn’t care how nice her stitches were if no one else could see them!

The Stitching from the Outside

The Stitching from the Outside

Let’s take a moment to admire her piping, however.  See how tiny and neat it is?

Lovely 1840's Piping!

Lovely 1840’s Piping!

For the collar, there is piping, horsehair braid, AND a tiny silk ruffle.  The tiny plain ruffle makes my friend Kay think this is a mourning dress, but I’m still undecided.  I tend to think this was simply a best dress, with a little bit of fancy trim around the collar.

1840's Collar Treatments Galore!

1840’s Collar Treatments Galore!

Front Collar Treatment

Front Collar Treatment

In the front of the collar, the lining snakes its way out of the piping binding, and becomes the faced front hook and eye closure, while the collar treatment continues on and becomes the front fashion fabric opening, with the hooks at the neck and down at the fan.  Very nice way of solving that problem!

Now, let’s talk sleeves:

1840's Dress Sleeve

1840’s Dress Sleeve

The sleeve is moderately full, but not so full that it is gathered or pleated into the armscye.  It is pleated neatly into a narrow cuff, and the front edge has fullness pleated into the elbow, to allow for freedom of movement.  As you can see, the sleeves are pieced, both exactly symmetrically.

1840's Sleeve Cuff

1840’s Sleeve Cuff

The sleeve cuff has a narrow band of silk velvet ribbon sewn on as trim, with a hook and thread eye closing each sleeve.  The velvet is worn threadbare, enough so one can see it was simply tacked on with a double running stitch, with the threads hidden in the pile of the velvet originally.

1840's Sleeve Cuff and Lining

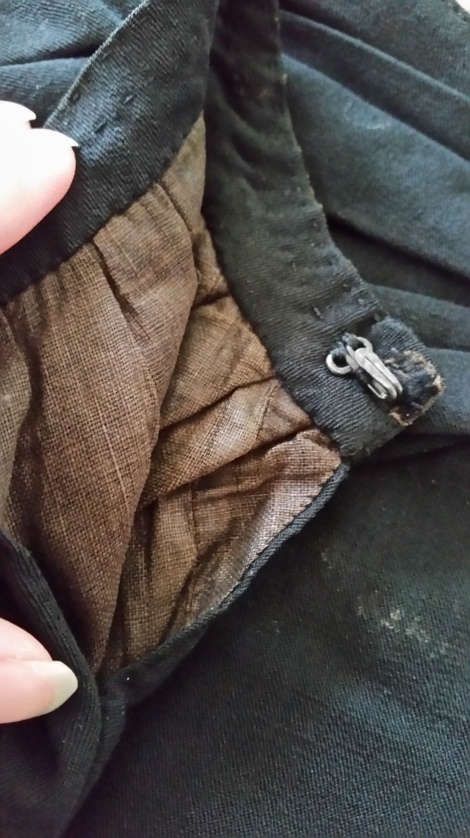
1840’s Sleeve Cuff and Lining

The sleeve lining is pieced, and has some shattering up by the elbow.  My guess is that the fabric wore thin there from movement.

1840's Dress Armscye

1840’s Dress Armscye

The armscye is trimmed close and whip stitched all around.  I think the cord up there is made of linen, but I’m not entirely sure of its purpose.  Perhaps it had something to do with hanging the dress when not worn.

Front of 1840's Dress Flat

Front of 1840’s Dress Flat

I’m still ridiculously pleased with this piece of history, and it is on my reproduction list, as soon as I have time.  I’m sure I will learn even more about how it was made when I begin the process of reproducing it.  In the meantime, it is safely packed away in an archival box, away from sunlight and bugs.  (It is no longer hanging on a wire hanger in an old house.)

Thanks for reading, and as always, I’m very happy to answer questions!


An 1840’s Summer Dress

This year, as I have told you before, I am participating in the Historical Sew Monthly.  The challenge for March was “Stashbusting”, meaning you had to use ONLY items from your stash.  I took that to mean items which I have had for a year or more.  Right away, I knew what I wanted to make!

Last year, I was at Hancock Fabrics getting some muslin or something, and as is my habit I was browsing the economy fabric section when a bolt of fabric caught my eye.  100% cotton in a charming print that just looked like it stepped out of the 1840’s, only $3 a yard regular price!  To make things even better, I had a coupon for 50% off any piece of fabric at regular price!  So I went home with 8 yards and only a vague idea of an 1840’s dress.

I commenced to research, and after a long stint of gazing at original dresses on Pinterest and comparing them to original patterns, I bought the Laughing Moon 114 Mercantile Fan Front Dress pattern.  I had everything together and I had a plan!  Except then we moved, and life got really busy, and the fabric just sat on my shelf, and waited.

Fabric and a Pattern

Fabric and a Pattern

So when I heard the challenge for March was “Stashbusting”, I knew I had to pull that fabric out and start that dress

But first I had to find that ONE dress that inspired me, that I wanted to take cues from and design features from to make the perfect dress,

Original 1840's Dress

Original 1840’s Dress

This dress, in a private collection and pictured on an auction site, fit the bill nicely.  I loved the opening at the front neck, and the little ruffles on the mancherons.  I was less a fan of the poofy lower sleeves though.  I absolutely LOVED the flat pleating for the fan front.  It just seemed more my speed than the frilly smocking at the front of many fan front dresses.

So then I had a plan.  Now I just had to put it into effect.

First, as all good seamstresses should, I made a mockup.  I traced and cut the pattern to the size suggested on the pattern envelope, only to find it was far too large in the waist.  This is why you always make a mock-up!  I was able to take in the darts on the final lining then, and properly fit the bodice to the lining.  I also boned the darts with spiral steel boning, because I feel it is closest to whalebone, having carefully felt the flex of the real thing on an antique once before.  (Cutting out the dress was only interesting in that I had to cut the right and left bias sleeves the opposite directions.)

Fan Front in the Making

Fan Front in the Making

Pleating the fan front was far easier than I thought it would be, and it went together nicely.  You can see the beginning of the partial front opening here too.

Next step was to put the whole bodice together.  This involved far more piping then I ever thought it would.  I had to make more.  First time I’ve ever had to make more piping.  My last two dresses with piping I had feet and feet left over.  (This time I piped the shoulder seams, the armscyes, the ends of the mancherons (short sleeves) above the ruffle, the long seam on the sleeves, the neckline, and the bottom edge.)

Piping Bodice Edge

Piping Bodice Edge

To finish the seams, since the bodice fabric was applied to the lining and then sewn together, I sewed bias strips over the seams.  Not the fastest way to finish seams but definitely very neat!

Finishing Seams

Finishing Seams

Finally, I had the bodice together, less sleeves.  Time for a fitting!

Fitting Selfie

Fitting Selfie

Yep.  Seems close!  (Actually, this picture is prior to the piping, it seems.  I tested the fit before and after, and after sleeves.)

So then, sleeves.  First step was to make the mancherons.

Mancherons!

Mancherons!

Let me take just a moment to talk about mancherons.  If you look up mancheron, you will see that it is either a sleeve used as a charge in French heraldry, or that it is an ornamental trimming on the upper part of a sleeve.  The latter definition more aptly applies here.  In the late 1830’s it was the style to either “band down” the great big poofiness at the tops of the puffed sleeves or to have a narrow upper sleeve connected to a poofy lower sleeve.  By the 1840’s this upper sleeve seems to have detached itself and become its own entity, known as the Mancheron.  Mancherons were a thing through much of the 1840’s, with many variations, though they were mostly (but not always) tight around the sleeve.  They were a place where one could add more lace or trim, and sometimes confined a more poofy lower sleeve.

I decided to add a little ruffle and more piping to mine, like in the original dress that inspired me, but I decided against the zig-zag lower edge.  I lined my mancherons with white muslin to enclose the piping and ruffle edge, and everything looked nice!

Now the actual sleeves.  I basted down the piping, and sewed my seams with the recommended seam allowance, and WOW!  They were way too big and just not flattering!  So I pinned them on my arm to get an idea for the tightness and took them way in, and WOW!  They were just too tight!  (I was doing this to just one sleeve.  Get one side right then copy onto the other side.)  So I let out the seam a measly 1/8″ and they were just right.  (And Goldilocks smiled at the sleeves and decided to keep them for herself.)  Every adjustment on these sleeves meant ripping off the piping again too.  Of course all this adjusting meant that my sleeves were just that much smaller than the mancherons, so I basted them together, easing the mancherons to the sleeve.  Good thing they were cut on the bias!

With my sleeves assembled, I sewed them into the strangely shaped armscyes of my bodice, using a zipper foot because of the piping.  It all went together smoothly, relatively.  Time for a fitting!  Well, I had to let out the back closure just a bit because sleeves change a lot of things, but it was all good!  So now, the skirt.

First I sewed my skirt seams.

Find the Seam

Find the Seam

I used mad pattern matching skills.  I had to take a very narrow seam on the edges of the fabric, as otherwise I would have lost quite a bit of the width of my fabric.  My skirt was three panels 60 inches wide, and either I would have had a lot of seam finishing, or I could make a careful narrow seam.  As the fabric had a very firm but not bulky woven selvedge, I went with a narrow seam.  It was barely 1/4″.  (In my defense, many original dresses have very narrow skirt seams as well.)

I had been fussing a bit over how to do the pleats on the skirt. The top edge of the skirt was straight, and the pattern recommended pleating it and sewing it to the waistline of the dress.  But I wanted the pleats to fan out from the point of the bodice like in so many extant dresses.  Then, I saw a wonderful video from Historical Sewing (http://historicalsewing.com/)  in which Jennifer was explaining how she intended to get her cartridge-pleated skirt to follow the bottom edge of her 1840’s bodice. (I’m not copying her, I swear!)  (You can find her video here: https://www.facebook.com/video.php?v=879267112131364&theater )  So, I followed Jennifer’s lead and pressed down the top edge of my skirt for the cartridge pleats, pressing the top fold deeper at the front where the front point was.  I measured how deep the point was below the waist line and made my fold that much deeper in the center, but the width was an exercise in “That looks about right”.  I did have the points for the side seams marked into the skirt, so I was just right, actually.

Stitching the Cartridge Pleats

Stitching the Cartridge Pleats

I ended up doing three rows of stitching for my cartridge pleats.  It took me about four evening to get them all done.

Then came the fun part– gathering up the pleats and attaching the skirt to the bodice!

Stitching Pleats Down

Stitching Pleats Down

Before I stitched the pleats down, I gathered them up, laid the skirt flat with the hem level, and held up the bodice to make sure the top edge was right– it was perfect!  So I started sewing the pleats down, one at a time.  As you can see, I made my pleats quite small and close together.  I counted and I had about 25 per inch in the back half and 20 per inch in the front half.  I had the same amount of fullness in the skirt all around, but there was more distance for the same number of pleat in the front due to the slope of the bodice point.

After stitching them down on the inside, I blind stitched every other pleat to the piping on the outside for a perfect effect.

All Stitched Down

All Stitched Down

This section took me about 5 hours, from gathering to skirt all the way on.

Now, I am a chicken, and I never hem skirts until I have them attached to my waistband because I am afraid I will make them the right length, so I measured and pressed the hem, using a different dress I knew was the right length and is worn over the same petticoats as a guide.  I laid them on the floor one on top of the other.  Simple but effective.  I opted to make this dress half an inch longer than the other dress.  At this point, it was Tuesday morning, and it was the final day of the Stashbusting challenge, so I had to hurry!  I sewed up the deep hem, sewed on hooks and made thread eyes, and finished the cuffs of the sleeves.  (They ended in little slits with hooks at the bottom so I can open them if needed and get my hand through when putting on the dress.)  As soon as my husband got home from work, I pressed the whole dress, got dressed, grabbed my handmade 1830’s-1840’s shoes and an old book for a prop, and we walked to the park to take photos!

(Let me just say here that my dear husband, Philip Patton is a wonderful photographer, and all of the photos that follow are his work and copyrighted by him.)

Perfect Hour of Sunset

Perfect Hour of Sunset

This was the first photo we took.  Up to this point, I had not seen myself in the dress, as I had put on the undergarments upstairs and the dress downstairs, where there was no mirror.  I was very pleased to see a nearly perfect 1840’s bell-shape silhouette!

Back

Back

Side

Side

I am wearing under this dress my 1830’s bloomers, my old 1840’s chemise from my first year of college (The 1830’s chemise has poofy sleeves which  won’t fit under the tight sleeves of this dress.), my old Silverado Bust Gore Corset I made when I was 16 going on 17 (still fits, but then again that is after I stopped growing), my tucked petticoat with lace, my corded petticoat, and my flounced crinoline and organdy petticoat.  No corset cover.  The bodice doesn’t really require one.

Ankles!

Ankles!

Also, my mustard stockings.  You can also see my handmade shoes in action here.

So Romantic

So Romantic

Looking at the Book

Looking at the Book

Hi!

Sigh…

I Feel Lovely

I Feel Lovely

It was the hardest thing to keep those little sections of hair over my ears.  I could hardly stand it.

Golden Light

Golden Light

Bodice Front Detail

Bodice Front Detail

Piping!

Piping!

Piping and Pleats!

Piping and Pleats!

Reading the Psalm Book

Reading the Psalm Book

This is a very sweet old Swedish Psalm Book I have, published in 1884.  (Yep, too late for this dress!)  It has in it the standard Scripture and Hymns for every Sunday of the year.  I just so happened to open it right up to the reading for Easter in this photo.

Also, these are my favorite sleeves I’ve yet done, I think.  I love everything about them!

So, as this is for the Historical Sew Monthly, I suppose I should give you the facts!

Challenge #3, Stashbusting!

What the item is: An 1840’s Summer Dress

The Challenge: Stashbusting!

Fabric: Lightweight 100% Cotton Print

Stashed for how long?: About a year.

Pattern: Laughing Moon Fan Front Dress, altered to my own liking.

Year: 1840’s.

Notions: Thread, hooks, spiral steel boning.

How historically accurate is it? I did a LOT of handsewing on this dress. A lot more than I typically do. The print I think is close enough, and I was inspired for the bodice pleats and frills on the sleeves by an original dress. I did use a machine for the long seams, though. 85-90%?

Hours to complete: Considering I spent about 5 hours on just attaching the skirt to the bodice, I don’t even want to know. I would guess 40+.

First worn: For pictures!

Total cost: Drumroll…. At $1.50 a yard for the fabric, the pattern cost more than everything else combined. $35 total. Ish.

Happy Easter!

Happy Easter!

If you have any questions or comments, I’d love to hear them and answer!  Thanks for reading!